Showing posts with label Kiddie Chefs. Show all posts

Monday, April 20, 2015

Home and Garden Idea Fair!

Do you enjoy doing energy effiency, love to improve your house/apartment/ yard, and want some new ideas? then you should check out the Public Utilities Home & Garden Idea Fair in Vancouver.

Clark Public Utilities are pleased to provide this outstanding event for their customer-owners as a way to share important information about utility programs and services that benefit you. But even more, this show provides the perfect opportunity for local businesses and organizations to promote their home and garden related products and services to the communities they serve.


The fair features hundreds of ideas on how to make your home, yard and garden a more beautiful, energy-efficient and environmentally friendly place. Here's the 2015 Show Guide, available in local newspapers just before the event, to give you an idea of what you can look forward to when you join them at the Home & Garden Idea Fair.

It‘s a fun filled show, with activities for the entire family. Admission is FREE and venue parking is $6. Attendees can save on parking by taking a free shuttle bus to the fairgrounds. There were two locations you could catch the shuttle: C-Tran's Fisher's Landing Transit Center on 164th Avenue, and the 99th Street Transit Center at Stockford Village.

We encourage canned food donations for local food banks or cash donations to Operation Warm Heart, but visitors don’t have to spend another dime at the fair unless they want to.


With more than 20,000 people who attend this three-day show each year, the Home & Garden Idea Fair has become one of the most popular community events in Clark County.


The 24th annual Clark Public Utilities Home & Garden Idea Fair will be held at the Clark County Event Center, located at 17402 NE Delfel Road in Ridgefield, Washington, just nine miles north of the I-5 bridge at exit 9.

Hours for the 2015 show are:
Friday, April 24: 9 a.m. to 6 p.m.
Saturday, April 25: 9 a.m. to 6 p.m.
Sunday, April 26: 10 a.m. to 5 p.m.

Wednesday, February 4, 2015

Savory Egg and Sweet Potato Scramble

Savory Egg and Sweet Potato Scramble
Delicious and nutritious, this recipe will be your new fan favorite!

Ingredients

  • 8 eggs
  • 1/3 cup milk
  • 1/2 teaspoon ground cumin
  • 1/4 teaspoon salt
  • 1/4 teaspoon ground black pepper
  • 1 tablespoon butter
  • 2 meduim sweet potatoes (about 1 pound total), peeled, quartered lengthwise and thinly sliced
  • 1 green onion, sliced
  • 2 cups baby spinach
  •   Fresh Italian (flat-leaf) parsley
  •   Bottled hot pepper sauce (optional)


Directions

  1. In a medium bowl whisk together eggs, milk, cumin, salt and pepper; set aside.
  2. In a large skillet melt butter over medium heat. Add sweet potato and green onion. Cook, stirring occasionally, until potatoes are lightly browned and just tender, about 8 minutes. Add spinach. Cook until slightly wilted, about 1 minute.
  3. Pour egg mixture over potato mixture in skillet. Cook, without stirring, until mixture begins to set on bottom and around edges.
  4. Lift and fold partially cooked egg mixture so the uncooked portion flows underneath. Continue cooking for 2 to 3 minutes or until egg mixture is cooked through but still glossy and moist. Sprinkle with fresh parsley.
  5. Remove from heat and serve at once. Pass bottled hot pepper sauce.

Chocolate Zucchini Bread

Chocolate Zucchini Bread
This classic quick bread gets a modern update in the form of dark chocolate. Mmmmmm, delicious...

Ingredients

  • 3 cups all-purpose flour
  • 1 tablespoon baking powder
  • 1 1/2 teaspoons ground cinnamon
  • 1 teaspoon salt
  • 2 eggs, lightly beaten
  • 2 1/2 cups coarsely shredded, unpeeled zucchini
  • 2 cups sugar
  • 1 cup vegetable oil
  • 2 teaspoons vanilla
  • 1 cup chopped walnuts or pecans (optional)
  • 1 1/4 cups dark chocolate pieces


Directions

  1. Preheat oven to 350 degrees F. Grease the bottom and 1/2 inch up the sides of two 8x4x2-inch loaf pans; set aside.
  2. In a large bowl stir together flour, baking powder, cinnamon, and salt. Make a well in the center of flour mixture.
  3. In a medium bowl combine eggs, zucchini, sugar, oil, and vanilla. Add zucchini mixture all at once to flour mixture. Stir just until moistened (batter should be lumpy). Fold in nuts (if desired) and 3/4 cup of the chocolate pieces.
  4. Pour batter into the prepared loaf pans, spreading evenly.
  5. Bake about 55 minutes or until a toothpick inserted near the centers comes out clean.
  6. Cool in pans on a wire rack for 10 minutes. Remove from pans; cool completely on rack.
  7. In a small saucepan cook and stir the remaining 1/2 cup chocolate pieces over low heat until melted. Drizzle melted chocolate over loaves.
  8. Wrap and store overnight before slicing.

Sunday, February 1, 2015

Pesto Veggie Gyro

This would have to be my most favorite recipe! It's delicious, healthy and fun to make. Remember, you can replace the veggies with any veggies your own kids love to eat!

Ingredients
1 cup packed fresh basil leaves
3/4 cup olive oil
1/4 cup finely shredded Parmesan cheese (1 ounce)
2 tablespoons pine nuts or chopped walnuts
2 tablespoons white wine vinegar
2 cloves garlic
1  Salt
1  Ground black pepper
1 pound zucchini or yellow summer squash, cut into 1/2-inch-thick slices
2 medium red sweet peppers, cut into 1-inch pieces
1 teaspoon dried oregano, crushed
2 8 ounce packages Halloumi cheese, cut into 1/3-inch-thick slices
6 8 inches flatbreads
1  Olive oil
3 cups shredded romaine lettuce
1 cup finely chopped red onion (1 large)

Directions
  1. For pesto vinaigrette, in a food processor or blender combine basil, 1/2 cup of the oil, the Parmesan cheese, nuts, vinegar, and garlic. Cover and process or blend until smooth. Season to taste with salt and black pepper. Cover and set aside.
  2. In a large bowl toss together squash, sweet peppers, the remaining 1/4 cup oil, and oregano. Thread vegetables onto 12-inch skewers,* alternating squash and pepper pieces.
  3. For a gas or charcoal grill, place skewers on the rack of a covered grill directly over medium heat. Grill for 12 minutes or until tender, turning once halfway through grilling. Meanwhile, lightly brush cheese slices and flatbreads with the additional olive oil. Place on grill rack; cover and grill about 2 minutes or until heated through and cheese is golden brown, turning once halfway through grilling.
  4. Fold flatbreads in half. Fill each with 1/2 cup of the lettuce, two grilled cheese slices, and the vegetables from one skewer. Top each with some of the onion and drizzle with some of the pesto vinaigrette.


Helpful Advice!
If using wooden skewers, soak in water for at least 30 minutes before grilling.

Zucchini-Banana Squares

Zucchini-Banana Squares
These chocolate dessert bars are made with heart-healthy whole wheat flour and flaxseeds. Zucchini adds nutrients and moisture. This is a really simple recipe to do with your kids that they'll be sure to enjoy!

Ingredients

1  Nonstick cooking spray
1 cup all-purpose flour
1 cup whole wheat flour
1/4 cup ground flaxseeds or wheat germ
1/4 cup unsweetened cocoa powder
2 teaspoons baking powder
1/2 teaspoon salt
1/2 cup refrigerated or frozen egg product, thawed, or 2 eggs, slightly beaten
3/4 cup sugar
1/2 cup canola oil
1/3 cup low-fat milk
1 cup peeled (if desired) and shredded zucchini
1 medium-size ripe banana, mashed (1/2 cup)
1/2 cup miniature semisweet chocolate pieces (optional)

Directions


  1. Preheat oven to 350 degrees F. Lightly coat a 13x9x2-inch baking pan with nonstick cooking spray; set aside.
  2. In a large bowl, combine all-purpose flour, whole wheat flour, flaxseeds or wheat germ, cocoa powder, baking powder, and salt. Make a well in center of flour mixture; set aside.
  3. In a medium bowl, whisk together egg, sugar, canola oil, and milk until well mixed. Stir in zucchini and banana.
  4. Add zucchini mixture all at once to flour mixture. Stir just until moistened. Fold in chocolate pieces. Pour batter into prepared pan, spreading evenly.
  5. Bake about 25 minutes or until top springs back when lightly touched. Cool completely on a wire rack. Cut into squares.

Saturday, July 26, 2014

Kids Cook at the Market

Portland Farmers Market Bounty

Junior chefs age seven to eleven cultivate their culinary skills and experience a cornucopia of farm-fresh foods by enrolling in cooking classes held at PFM’s Saturday market.

At these classes, kids learn about the seasonality of food, meet local farmers, and gain first-hand experience preparing ingredients purchased fresh at the market. Classes are taught by instructors and students of The International Culinary School at the Art Institute of Portland and include a guided market tour, hands-on instruction and recipes to take home so students can share what they learn with family and friends.

Kids Cook classes are held at the PSU Market on Saturdays in June, July and August.  The classes run from 8:30am – 10:00am and cost $5 per child per class. 

2014 Class Schedule
August 2 - Fresh Market Fruit Kabobs with Yogurt and Granola

August 9 - Very Berry Cherry Shortcakes - SOLD OUT

August 16 - Summer Tomato and Sweet Basil Bruschetta

August 23 - Fresh Fruit Tarts - SOLD OUT

Pre-registration is strongly recommended, as class size is limited. To register, please download the Kids Cook Registration form and return by mail, or for more information or to register for classes by phone or email please, email Anna Curtin or call her at 503.241.0032.

Sunday, May 4, 2014

Leia Cupcake

The only main female character in the original Star Wars trilogy, Princess Leia made her mark not only by her wits, bravery but also with her fashion choices. Her icon status was sealed with the double hair buns that were steadfastly by her side when she held her ground in battle. Other looks came and went, Hoth braids, Endor chic, but it’s the hair buns that were the most memorable.
Translating the hairdo to dessert was obvious, because who doesn’t look at Oreos and immediatly think “hairstyle?” It’s the ‘do that makes the woman and in this case, it’s the ‘do that makes the cupcake.

You can uses any cupcake recipe of your choice for this recipe, Leia is only the topper.

Ingredients
  • cupcakes
  • cream cheese frosting
  • black frosting
  • heart quins
  • Oreos


Directions
  1. Take your cooled cupcake and spread a THIN smooth layer of frosting on top. I used cream cheese frosting because it has a slight off white tint to it, which I liked for the complexion.
  2. Take the black frosting with a #4 tip and start on one side of the hair first. (We are going for a middle part, here.) Add the other side of the hair and then the eyes. Place a little heart quin for the lips. Now for the hair buns, stick an Oreo to one side of the cupcake liner, using the black frosting to hold it tight. Do the same for the other side. To get rid of the ‘white line’ i.e. creamy center, simply run a thin layer of black frosting down the center of the sandwich cookie.

These cupcakes are sure to impress any little jedis to be at your next Star Wars party!

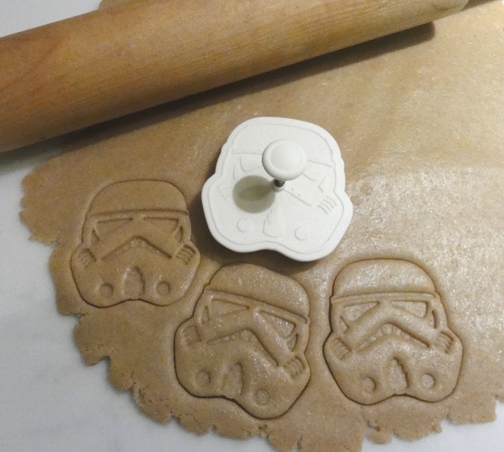
Stormtrooper Graham Cracker


Sure you can go to the store and buy graham crackers, but they will be square and have those little holes all over them. I need mine in the shape of…Stormtroopers. They will do your bidding.

Ingredients
  • 2 cups whole wheat flour
  • 1 cup all-purpose flour
  • Pinch of salt
  • 1/4 teaspoon cinnamon
  • 1/2 teaspoon baking soda
  • 1/2 cup butter, softened
  • 1/2 cup brown sugar
  • 1/3 cup honey
  • 2 teaspoons vanilla
  • 1/2 cup whole milk


Directions
  1. In a bowl, whisk together the whole wheat flour, all-purpose flour, salt, cinnamon and baking soda. Set aside.
  2. In the bowl of an electric mixer, cream the butter and brown sugar. Once combined, add the honey and vanilla.
  3. Alternate the dry ingredients with the milk until combined. When the dough starts to pull away from the bowl, you’re done!
  4. Separate the dough into two disks and wrap in plastic wrap. Keep the fridge until you are ready to use.
  5. Roll the dough out to a thin 1/8 of an inch. You can cut squares like a traditional graham cracker, but I used stormtrooper cookie cutters for a very specific project.
  6. Bake at 350 degrees for 12-15 minutes depending on your oven.
  7. Let cool on a wire rack. Here Spatula Vader rallies his troops before they are eaten.

These smell and taste like store bought graham crackers – but waaay better. I’m sure all stormtroopers eat these homemade graham crackers to gather strength before they fight the rebels!

Stormtrooper Smores Cupcake

I decided to make some homemade Graham Crackers (in Stormtrooper form of course) and use them as toppers on a marshmallow filled chocolate cupcake. Thus, SMOREStroopers. Oh word puns, you never get old.


Ingredients
  • 1 cup (2 sticks) butter
  • 2 cups sugar
  • 2 eggs
  • 1 teaspoon vanilla
  • 1 cup whole milk
  • 3/4 cup cocoa powder
  • 2 cups flour
  • 1-1/2 teaspoons baking powder
  • 1 teaspoon baking soda
  • 1/2 teaspoon salt
  • marshmallow fluff
  • chocolate frosting
  • homemade Graham Crackers


Directions
  1. Preheat oven to 350 degrees. Prep a cupcake pan with liners.
  2. In a medium bowl whisk together the flour, cocoa powder, baking powder, baking soda and salt.
  3. In the bowl of an electric mixer cream the butter and sugar until fluffy.
  4. Add the eggs, one at a time. Then the vanilla.
  5. Alternate the flour mixture and the milk until combined.
  6. Spoon the batter into the prepped liners. Bake the cupcakes for 15-17 minutes depending on your oven. Let cool on a wire rack.
  7. When the cupcakes are cooled, using a cutter or a paring knife, simply cut out a little well in the middle. Fill the well with the marshmallow creme.
  8. Frost the cupcakes, then place a homemade Stormtrooper graham cracker on top. And suddenly you have – SMOREStroopers cupcakes!!

Vegan Chocolate Cupcake with Peanut Butter Frosting

These cupcakes are so deeelish you won’t even notice they’re Vegan! Think – peanut butter cup in a cupcake form. Mmm…


Vegan chocolate cupcakes ingredients
  • 2-1/2 cups flour
  • 1/2 cup cocoa powder
  • 1-1/2 teaspoon baking powder
  • 1/2 teaspoons baking soda
  • 1/2 teaspoon salt
  • 2 cups white sugar
  • 2/3 cup vegetable oil
  • 1 teaspoon vanilla
  • 1 teaspoon apple cider vinegar
  • 1/2 cup coffee
  • 1/2 cup water

Chocolate peanut butter frosting ingredients
  • 6 ounces chocolate chips
  • 3/4 cup peanut butter
  • 1 teaspoon vanilla
  • 2-1/2 cups powdered sugar
  • 1/2 cup water


Directions
  1. Preheat the oven to 350 degrees. Prep cupcake pans with liners (24 total).
  2. In a bowl whisk together the flour, cocoa powder, baking powder, baking soda and salt.
  3. In the bowl of an electric mixer stir together the sugar, vegetable oil, vanilla and apple cider vinegar.
  4. Alternate the flour mixture with the coffee and water until combined.
  5. Pour the batter into the prepped cupcake liners and bake for 14-17 mins depending on your oven. Don’t over bake! Let cool on a wire rack.
  6. While the cupcakes are cooling, start the frosting. Melt the chocolate chips in the microwave.
  7. In the bowl of an electric mixer stir together the melted chocolate chips and the peanut butter. Slowly add the powdered sugar alternating with the water. You might need 1 or 2 Tablespoons more of water to get the frosting to the right consistency.
  8. Frost the cooled cupcakes and you have a deliciously Vegan chocolate peanut butter treat!

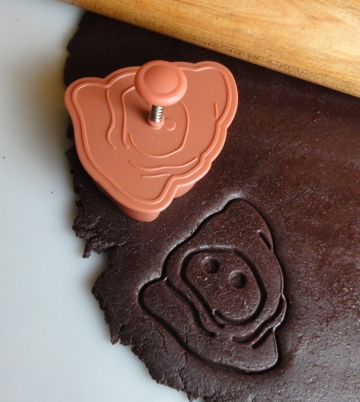
Vegan Jawa Cookie Cupcakes


Anytime a new Star Wars or Marvel cookie cutter comes out at Williams Sonoma, I immediately start sketching ideas.
The new Droids and Aliens cutters came out and I was drawn to the Jawas. I was always fascinated with how the hoods covered them entirely and how deeply inset their faces seemed to be – what exactly was behind those beady yellow eyes? I knew I wanted to capture that same idea when using the cookie cutters.
I was going to a Merry Sithmas party (hey, we’re geek girls and we love the holidays), and one of the guests had a lot of food allergies. She is always left out when it came to desserts and seeing as how she LOVES Star Wars as much as I do, I decided to come up with a totally Vegan cookie and cupcake combo.


Ingredients
  • 1-1/2 cups all-purpose flour
  • 3/4 cup cocoa powder
  • 1/2 teaspoon baking soda
  • 1/2 teaspoon baking powder
  • 1/2 teaspoon salt
  • 1/3 cup vegetable oil
  • 1 cup sugar
  • 1/4 cup water
  • Jawa Cookie Cutter
  • edible sugar pearls
  • Vegan Chocolate cupcakes
  • Vegan Chocolate Peanut Butter frosting


Directions
  1. In a bowl whisk together the flour, cocoa powder, baking soda, baking powder and salt.
  2. In the bowl of an electric mixer stir together the vegetable oil and the sugar until combined. Add the flour mixture and the water.
  3. It will be crumbly, but knead it together and roll it into a ball and flatten to a disc. Wrap it in plastic wrap and keep in the fridge until you are ready to use.
  4. Preheat the oven to 350 degrees and prep baking sheets with silpats. Once the dough has chilled, roll it out onto a floured board. Using the cookie cutter, cut out the Jawas.
  5. Use a paring knife to cut out the ‘face’ part of the Jawa, leaving an empty hole in the cookie.
  6. Transfer the cookies to the prepped baking sheets and bake for 8-10 minutes. Let cool on a wire rack.
  7. Frost the cupcakes and place the Jawa cookie on top. Add the sugar pearls for eyes.
  8. Now you have a very sneaky little Vegan Jawa!

Whipped Cream Frosting

I wanted to come up with a frosting that was light and airy, whipped cream with a touch of cream cheese flavor. This frosting is like eating a little cream cheese-y cloud on top of a cupcake. This is a perfect topping for almost any cake.


Ingredients
  • 8 ounces of cream cheese, softened
  • 4 Tablespoon heavy cream
  • 1 cup powdered sugar
  • pinch of salt
  • 1/2 teaspoon vanilla
  • 1-1/2 cups heavy cream


Directions
  1. In the bowl of an electric mixer, mix together the cream cheese, heavy cream, powdered sugar, salt and vanilla. Mix until well blended. Set aside.
  2. In a separate bowl whip the heavy cream on high, just until almost stiff, not all the way. Add in the cream cheese mixture and whip up again. Don’t overdo it, or you’ll get a curdled look, not so pretty for cupcakes. Fold the frosting to make sure everything is incorporated.
  3. Now you’re ready to pipe or frost!

Wampa Arm Cake

Today is May 4th. MAY THE FOURTH BE WITH YOU. That’s right, it’s Star Wars Day!
I have a lot of Star Wars love so I decided to post some cool recipe ideas for this day! I will be posting more, like  Princess Leia cupcakes, Smores Troopers, and Jawa cupcakes…but nothing, nothing will compare to what I have for you today. To celebrate Star Wars Day 2014 I give you…a severed Wampa arm made out of cake!
A wampa was the ice creature that captured Luke when he was on Hoth. Using the force, the young Jedi gets his lightsaber and slices off the wampa’s arm to make his escape. This is my version…in cake.


Ingredients
  • 6 egg yolks
  • 3/4 cup white sugar
  • 1-1/2 teaspoons vanilla extract
  • 1 cup cake flour
  • 1/2 teaspoon baking powder
  • Pinch of salt
  • 6 egg whites
  • Red gel food coloring
  • powdered sugar for dusting
  • 1 cup Guava jelly
  • Whipped Cream Cheese Frosting
  • 2 cups sweetened coconut
  • Chocolate bars


Directions
  1. Preheat oven to 375 degrees. Prep a 10×15 inch jellyroll pan with parchment, lightly buttered.
  2. In the bowl of an electric mixer, beat the egg yolks and sugar until light. Add the vanilla. Whisk together the flour, baking powder and salt and add it to the yolk mixture. While mixing, add in the red gel food coloring until combined. Set aside.
  3. In a separate bowl whip the egg whites until stiff peaks form. Fold the egg whites into the red batter until combined.
  4. Pour the batter into the prepped jelly roll pan – using a spatula to even it all out. Bake for 8-10 minutes depending on your oven.
  5. Get a CLEAN dishtowel and dust it with powdered sugar. Turn the warm cake onto the towel. Peel back and pull off the parchment paper.
  6. Cut about 3” off the end of the cake and slice that into 1” wide pieces – these will be the Wampa fingers. Set aside for later.
  7. Roll the cake up with the towel – the LONG way. What you are doing is trying to form the rolled shape. Let cool in the rolled up towel for 20- 30 minutes.
  8. Whisk the jelly to get it nice and loosened up, also reserve about 3 Tablespoons for later. Guava jelly is light, almost clear and always makes for good ‘blood’ substitute but a dark jelly will work also.
  9. Carefully unroll the cake, and spread the jelly onto the cake. Now roll the cake up again. Quite obviously NOT with the towel. Place the rolled cake seam side down onto a platter.
  10. Arrange the Wampa ‘fingers’ you cut at the end of a platter so they look like a hand.
  11. Frost the cake arm and ‘fingers’ with the whipped cream cheese frosting.


    12.Getting between the ‘fingers’ can be tricky, just use a small offset spatula and take your time.


   13.Take the coconut and pat it around the frosted cake and fingers, like ‘fur.’
   14.For the fingernails I cut a thick chocolate bar into chunky pieces and placed them on the end of the fingers.
   15.Finally, take the reserved jelly and pour it on the cut end of the ‘arm’. It will look like oozing Wampa blood.

Who’s ready for Wampa? YUM!


Saturday, May 3, 2014

Raspberry Birthday Cakes

Want a yummy cake for your little ones birthday party? Here is a perfect recipe for a personal cake just for them. Add this 30-minute dessert to your menu. It combines shortcake, raspberries, and a hint of lemon.


Ingredients
  • 1/2- 8 ounce cream cheese, softened
  • 2 tablespoons butter, softened
  • 1/4 cup lemon curd
  • 3 tablespoons powdered sugar
  • 1- 4 1/2 ounce package prepared shortcakes
  • 1/2 cup fresh raspberries
  • 2 tablespoons low-sugar raspberry preserves
  • Fresh raspberries
  • Small fresh mint leaves


Directions
  1. For frosting, in small bowl beat cream cheese and butter with electric mixer on medium until smooth. Beat in lemon curd. Add powdered sugar; beat until smooth and fluffy. Set aside.
  2. Place two cakes, well sides up, on two dessert plates.
  3. Divide berries, in a single layer, between wells of two cakes.
  4. Spoon 1/2 tablespoon preserves over each. Place remaining cakes, well sides down, over filling. Spread frosting on cakes.
  5. Serve immediately or refrigerate, loosely covered, up to 48 hours.
  6. To serve, stir remaining raspberry preserves; spoon on cakes. Top with additional raspberries and mint leaves. Makes 2 cakes (4 servings).

Wednesday, April 23, 2014

Oaty Rhubarb Streusel Bars

The rhubarb filling for these tasty treats is baked to a bubbly, golden brown. A ginger icing finishes them off.


Ingredients
Bar
  • 1 1/2 cups quick-cooking rolled oats
  • 1 cup all-purpose flour
  • 3/4 cup packed brown sugar
  • 3/4 cup butter
  • 1/4 cup granulated sugar
  • 2 tablespoons all-purpose flour
  • 1/2 teaspoon ground ginger
  • 2 cups fresh or frozen unsweetened sliced rhubarb
  • 1 tablespoon finely chopped crystallized ginger(optional)
Ginger Icing
  • 3/4 cup sifted powdered sugar
  • 1/4 teaspoon ground ginger
  • 3 teaspoons apricot nectar, orange juice, or milk


Directions

  1. Preheat oven to 350 degrees F. Line 8x8x2-inch baking pan with heavy foil extended beyond pan edges.
  2. In large bowl stir together oats, the 1 cup flour, and brown sugar. Cut in butter until mixture resembles coarse crumbs. Set aside 1 cup oats mixture. Press remaining on bottom of prepared pan. Bake 25 minutes.
  3. Meanwhile, in medium bowl stir together granulated sugar, 2 tablespoons flour, and ground ginger. Add rhubarb; toss to coat. Spread on hot crust. Sprinkle reserved oats mixture; press lightly.
  4. Bake 30 to 35 minutes, until top is golden and filling is bubbly. Cool on rack. 
  5. Make the Icing in small bowl stir together powdered sugar, ginger, and apricot nectar, orange juice, or milk.
  6. Drizzle icing, sprinkle crystallized ginger. Lift from pan; cut into bars. Store, covered, in refrigerator up to 2 days. Makes 16 bars.

Monday, April 14, 2014

Berry Breakfast Pizzas

Okay, This will be the most wonderful summer time breakfast you'll ever have! There is just something special about eating a whole bunch fruits on a hot day.

Ingredients
  • 1/4 cup granulated sugar
  • 4 teaspoons cornstarch
  • Dash salt
  • 1/2 cup water
  • 2 cups mixed fresh berries, such as blueberries, raspberries, and/or blackberries
  • 1 teaspoon butter
  • 1 teaspoon finely shredded orange peel
  • 4 ounces reduced-fat cream cheese (Neufchatel), softened
  • 2 tablespoons orange marmalade
  • 2 teaspoons granulated sugar
  • 1/4 teaspoon ground cardamom
  • 2 pita bread rounds, split
  • 2 tablespoons butter, melted
  • Powdered sugar (optional)


Directions
  1. For berry topping, in a medium saucepan combine 1/4 cup granulated sugar, cornstarch, and salt. Stir in the water. Stir in 1/2 cup of the berries.
  2. Cook and stir over medium heat until thickened. Remove from heat.
  3. Add an additional 1 cup of the berries and the 1 teaspoon butter, stirring until butter is melted. Gently stir in orange peel. 
  4. In a medium bowl combine cream cheese and orange marmalade; beat with an electric mixer on low to medium speed until smooth.
  5. In a small bowl stir together the 2 teaspoons granulated sugar and the cardamom. 
  6. Toast the split pita rounds. Brush pita rounds with the 2 tablespoons melted butter; sprinkle with the sugar-cardamom mixture.
  7. Spread cream cheese mixture over split pita rounds. Spread berry topping over cream cheese mixture. Top with the remaining 1/2 cup berries. If desired, sprinkle with powdered sugar. 


Tips!
          If desired, make the berry topping and cool completely. Cover and chill at least 2 hours or up to 8 hours before using.

Sunday, April 13, 2014

Pumpkin Pancakes

This is a healthy and freakishly delicious breakfast made up of pumpkins! Who doesn't love pumpkins? I like to make these on the weekends, it's like a little special treat. Plus, what kid wouldn't want to get there hands dirty in making this recipe?


Ingredients
  • 2 cups all-purpose flour
  • 2 tablespoons packed brown sugar
  • 1 tablespoon baking powder
  • 1 teaspoon salt
  • 1 teaspoon ground cinnamon
  • 1/4 teaspoon ground nutmeg
  • 1/4 teaspoon ground ginger
  • 1 3/4 cups milk
  • 1/2 cup canned pumpkin
  • 2 eggs
  • 2 tablespoons vegetable oil
  • Maple syrup and/or chopped nuts (optional)


Directions
  1. In a large bowl combine flour, brown sugar, baking powder, salt, cinnamon, nutmeg, and ginger. In a small bowl stir together milk, pumpkin, eggs, and oil. Add pumpkin mixture all at once to flour mixture. Stir just until moistened (batter should be slightly lumpy). 
  2. For each pancake, pour about 1/4 cup of the batter onto a hot, lightly greased griddle or heavy skillet. Spread batter, if necessary. Cook over medium heat for 1 to 2 minutes on each side or until pancakes are golden brown, turning to second sides when surfaces are bubbly and edges are slightly dry. Serve warm. If desired, serve with maple syrup and/or nuts.

Friday, April 4, 2014

Apple-Cinnamon Pull-Apart Bread

Obsessed with apples? then this is perfect for you! Its filled to the brim with appley goodness and tastes like heaven!


Ingredients
  • Nonstick cooking spray
  • 1- 7 1/2 ounce package (10) refrigerated reduced-fat home-style biscuits
  • 4 teaspoons ground flaxseeds
  • 2 teaspoons granulated sugar
  • 1/2 teaspoon ground cinnamon
  • 1/2 of a medium apple, cored and thinly sliced
  • 3 tablespoons coarsely chopped walnuts
  • 2 tablespoons packed brown sugar
  • 2 tablespoons orange juice
  • 1 tablespoon butter
  • 2 tablespoons reduced-fat cream cheese, softened
  • 2 teaspoons orange juice
  • 1/2 teaspoon vanilla


Directions
  1. Preheat oven to 350F. Coat an 8x4x2-inch loaf pan with cooking spray; set aside. Cut biscuits in half crosswise. In a small bowl combine ground flaxseeds, 11/2 teaspoons of the granulated sugar, and the cinnamon. Roll biscuits in flaxseed mixture to coat. Alternately arrange biscuit halves and apple slices in the prepared loaf pan. Sprinkle with any remaining flaxseed mixture. Top with walnuts. 
  2. In a small saucepan combine brown sugar, 2 tablespoons orange juice, and butter. Cook and stir over medium-high heat until boiling. Pour mixture over biscuits. Bake about 25 minutes or until edges are golden and biscuits near center are done. Cool in pan on a wire rack for 5 minutes. Invert loaf onto a small baking sheet. Invert again onto a serving platter. 
  3. For icing, in a small bowl whisk together cream cheese, 2 teaspoons orange juice, vanilla, and the remaining 1/2 teaspoon granulated sugar. Drizzle bread with icing. Serve warm.

Monday, March 31, 2014

Red Flannel Hash Browns

Enjoy breakfast foods as much as I do? Than you will love this! It's not too bad for you and filled to the brim with delicious goodness that all kids and adults will enjoy.


Ingredients
  • 1 pound russet potatoes
  • 6 ounces cooked corned beef, chopped
  • 1/2 cup coarsely shredded carrot (1 medium)
  • 1/2 cup chopped pickled beets or leftover roasted beets
  • 1/2 teaspoon snipped fresh thyme
  • Salt
  • Ground black pepper
  • 1 tablespoons olive oil
  • 1 tablespoon butter
  • 1/4 cup crumbled blue cheese or shredded sharp white cheddar cheese
  • 1 tablespoon cider vinegar
  • 6 eggs


Directions
  1. Peel and coarsely shred potatoes. Place potatoes in a large bowl; add enough water to cover potatoes. Stir well. Drain in a colander set over the sink. Repeat rinsing and draining two or three times until water runs clear. Drain again, pressing out as much water as you can with a rubber spatula. Line a salad spinner with paper towels; add potatoes and spin.* Repeat, if necessary, until potatoes are dry. In a large bowl combine potatoes, corned beef, carrot, beets, thyme, 1/4 teaspoon salt, and 1/4 teaspoon pepper. 
  2. In a 10-inch nonstick skillet** heat 1 tablespoon of the oil and the butter over medium-high heat until butter foams. Add potato mixture to the skillet, spreading into an even layer. Gently press with the back of a spatula to form a cake. Reduce heat to medium-low. Cook, without stirring, about 14 minutes or until the bottom is golden brown and crisp. 
  3. Invert a plate over the top of the skillet. Carefully invert the skillet to transfer the hash mixture to the plate. If needed, add the remaining 1 tablespoon oil to the skillet. Using the plate, slide the hash mixture back into the skillet, uncooked side down. Cook about 8 minutes more or until the bottom is golden brown. Sprinkle with blue cheese. Transfer to a serving platter. Cover loosely and keep warm. 
  4. Wipe out the skillet and fill it halfway with water. Add vinegar and bring to boiling; reduce heat to simmering (bubbles should begin to break the surface of the water). Break an egg into a cup and slip egg into the simmering water. Repeat with the remaining eggs, allowing each egg an equal amount of space in the water-vinegar mixture. Simmer eggs, uncovered, for 3 to 5 minutes or until whites are completely set and yolks begin to thicken but are not hard. Using a slotted spoon, remove eggs from water. (Season to taste with additional salt and pepper.) 
  5. Top each serving of hash with a poached egg. 


Tips!If desired, instead of using a salad spinner, potatoes can be dried by pressing the water out with a potato ricer or by patting the shredded potatoes dry with paper towels. A skillet with sloping sides works particularly well.

Sunday, March 30, 2014

Hash Brown Quiche

Hash browns can always be counted on to add heartiness to egg breakfast recipes. Here, they double as a crisp crust for this irrestible breakfast quiche.


Ingredients
  • 1 3/4 pounds russet potatoes
  • 1/2 teaspoon salt
  • 1/8 teaspoon ground black pepper
  • 1 tablespoons olive oil
  • 1 tablespoon butter
  • 4 slices bacon
  • 1 1/4 cups coarsely shredded zucchini (1 medium)
  • 1/2 cup chopped red onion (1 medium)
  • 4 eggs, lightly beaten
  • 1 cup half-and-half or light cream
  • 1/4 teaspoon crushed red pepper
  • 1 cup shredded Swiss cheese (4 ounces)
  • 1 tablespoon all-purpose flour


Directions
  1. Preheat oven to 325 degrees F. Peel and coarsely shred potatoes. Place potatoes in a large bowl; add enough water to cover potatoes. Stir well. Drain in a colander set over the sink. Repeat rinsing and draining two or three times until water runs clear. Drain again, pressing out as much water as you can with a rubber spatula. Line a salad spinner with paper towels; add potatoes and spin.* Repeat, if necessary, until potatoes are dry. Transfer potatoes to a large bowl. Sprinkle potatoes with 1/4 teaspoon of the salt and the black pepper, tossing to combine. 
  2. In a 12-inch nonstick skillet** heat 1 tablespoon of the oil and the butter over medium-high heat until butter foams. Add potatoes to the skillet, spreading into an even layer. Gently press with the back of a spatula to form a cake. Reduce heat to medium. Cook, without stirring, about 12 minutes or until the bottom is golden brown and crisp. 
  3. Place a baking sheet or cutting board over the top of the skillet. Carefully invert the skillet to transfer the potatoes to the baking sheet. If needed, add the remaining 1 tablespoon oil to the skillet. Using the baking sheet, slide the potatoes back into the skillet, uncooked side down. Cook about 8 minutes more or until the bottom is golden brown. 
  4. Lightly grease a 9-inch pie pan or plate. Use the baking sheet to transfer hash browns to pie pan, pressing hash browns into the bottom and up the sides of the pie pan. 
  5. In a large skillet cook bacon until crisp. Drain, reserving 1 tablespoon of the drippings. Crumble bacon; set aside. Cook zucchini and onion in the reserved drippings over medium heat for 3 to 5 minutes or until tender but not brown. 
  6. In a large bowl combine eggs, half-and-half, the remaining 1/4 teaspoon salt, and the crushed red pepper. Stir in bacon and zucchini mixture. In a small bowl combine shredded cheese and flour. Add to egg mixture; mix well. 
  7. Pour egg mixture into the hash-brown lined pie pan. Bake for 50 to 55 minutes or until a knife inserted near the center comes out clean. Let stand for 10 minutes before serving. 


Tips!
If desired, instead of using a salad spinner, potatoes can be dried by pressing the water out with a potato ricer or by patting the shredded potatoes dry with paper towels. A skillet with sloping sides works particularly well with this recipe!